
Add some extra whimsy to your home with this D.I.Y Halloween cloche. Trust me, It’s practically magic. For as long as I can remember I’ve always wanted to work on a cloche, but I never found the muse, time, or cloche worth buying. Well, my inspiration finally hit me as I was shopping at Target on Saturday afternoon. I found this incredibly large, plastic Halloween cloche that I had to have and the best part…it was $10 dollars. At the time I had no idea what I was going to put it in, but I had to have it and like Arian Grande…”I wanted it. I got it.” But before I get into the rest of my story and the projects itself, I think it’s important we dive into what a cloche is and how you even pronounce the damn thing.
What even is a cloche and how do you pronounce it?
Not to be confused with a woman’s bell-shaped hat, the cloche we’re talking about today is actually a “gardening cloche” turned decorative cloche. Originally, the cloche was made to protect plants from colder temperatures. Essentially, the gardening cloche was like a baby-greenhouse, it meant that plants could be planted earlier because of the protection offered by the glass.
However, the gardening cloche, though still being used by plant hobbyists as it was intentionally designed, has evolved into a decorative motif of sorts. Cloches were usually bell-shaped and made of glass in order to aid plants in the colder months, but today you’ll often find them made of plastic and living inside of the home, usually on a mantle or table with things other than plants inside of them.
Cool story, bro. What’s this Halloween cloche all about?
Well, if it isn’t obvious by know…we are going to be making a decorative Halloween cloche using our Cricut Explorer 2, cardstock, moss, and some other stuff. The inspiration? Practical Magic, the movie.
Since Halloween is just around the corner, I usually spend the majority of September planning and making my own decorations. There’s something magical about making your own seasonal adornments and really getting your home in the festive spirit .
Jam out to our Season of the Witch Playlist to help get you in that witchy spirit!
WHAT YOU’LL NEED
The Files
The Files you’ll need in order to recreate this cloche can be downloaded from our Etsy site. The files include the following:-
- Owen’s Family Home
- A White Picket Fence
- The Owens Witches Silhouette
- A Forest
- Twirling rose and thorny vines.
The Materials
- A Large Halloween Bat Decorative Cloche (Or any cloche of your choosing really)
- 2 White 12×12 Pieces of Cardstock
- 1 Black 12×12 or smaller Piece of Cardstock
- 1 Green 12×12 Piece of Cardstock
- 2 12×12 Black Vinyl Sheets
- Cricut Explore (or Cricut Maker)
- The Cricut Scoremark Stylus
- 1 Moss Collection Moss Mat Peel & Stick
- Double-Sided Tape or any strong adhesive
- LED Fairy lights of your choosing (25 ct or more)
THE HALLOWEEN CLOCHE ASSEMBLY
Step 1 | Make your cuts

If you’ve downloaded the SVG files from our Etsy shop, this whole process will be a breeze.
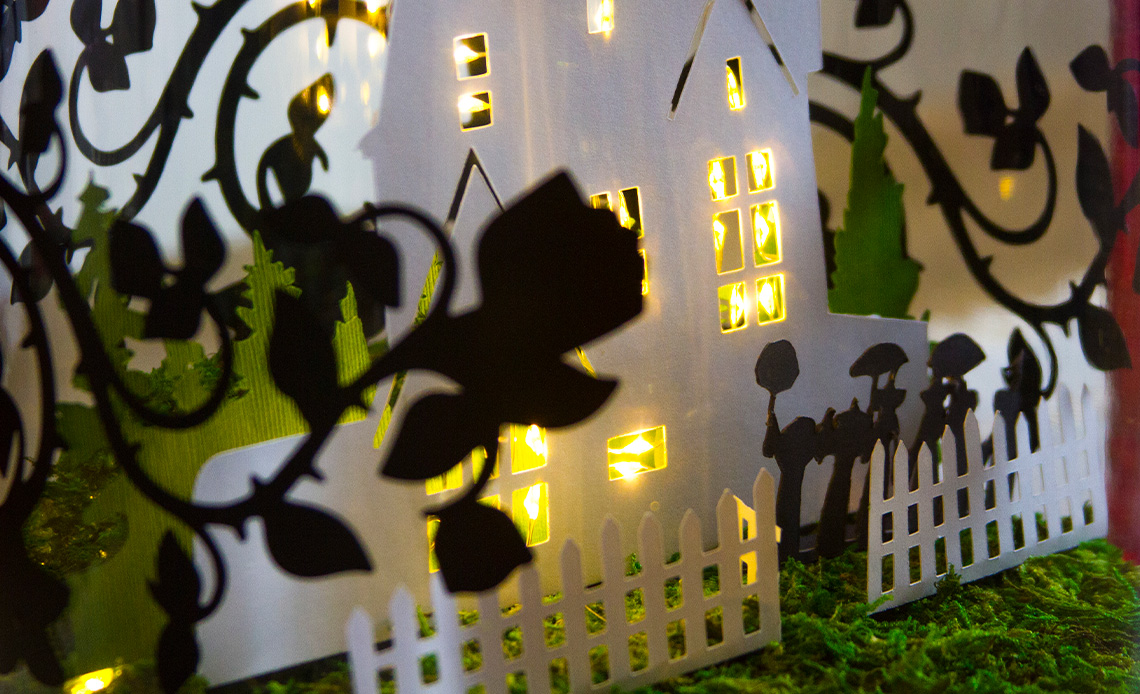
The night prior to creating the cloche, I spent the majority of the evening trying to plan and create the silhouettes I wanted. So using a lot of my time and my imagination I came up with the Owen’s home, the trees that would fit behind the house, the fence in the front, the ladies in the yard, and the vines that will eventually wrap themselves around the “glass” of the cloche.
Once you’ve downloaded the files, you can simply upload them to your Cricut. It is super important to add your own score lines so that you can easily fold the paper. If you’ve never added a scoreline you’ll need two things, one of them is to buy the Scoremark Stylus from Cricut, and the next thing is to add the scoreline onto your SVG files.
After you’ve cut out and scored all of your cardstock, move onto cutting out the vinyl twirling rose and thorny vines in a matt black or glossy black vinyl.
NOTE: You want to make sure that when you’re preparing your files in the circuit that they’re the exact dimensions needed. The House, trees, and fence all spanned 8 inches.
Step 2 | Place the vinyl on the cloche

The first thing I did on the cloche was to place the three vinyl twirling rose and thorny vines on the “glass” side of the cloche. I arranged the three vinyl cuts to appear as if the vines were wrapping themselves around the house inside of the cloche. I placed them about an inch away from the rim of the cloche so it could appear as If there were floating.
Step 3 | Build your turf (add your Moss)


This step was fun! Using my Moss Collection Moss Mat Peel & Stick that I bought from Joann, I placed the moss ontop of the cloche, and began cutting alongside the groove of the cloche in order to make my “not-so-perfect circle.” After I had my shape down, I removed the pad from the back of the moss and very carefully placed the moss down on the surface. Be very careful with this because the adhesive is very sticky.
Step 4 | Light up your house


With the “turf” newly planted, it’s time to light up your house. Yes, I know it’s weird that your lighting it up before putting it down, but trust me…it’s necessary. So for this part, I had my very patient husband put on the lights, as you can tell from the photo… he made sure that every little part of the window had an individual LED light, which he stuck to the cardstock using invisible tape. You can choose to get creative with this, but I wanted something very clean. Any and all loose wiring I just hid under extra pieces of moss that I cut out and placed over, or hide it behind the forestry.
Step 5 | Attach your house and everything else

Once you’re done with the lighting of your house, line the bottom flap of the cardstock house with some adhesive, I used some very stick double-sided tape, but feel free to use whatever you like for this step. I pressed the house somewhat into the center of the cloche because I really wanted to give the other items some proper spacing.
When you’re finished with the house it’s time to build everything else out. Apply your adhesive of choice to the flap of the tree cut-out and put it directly behind the house, that’ll help hide any wiring from the fairy lights.
Next up, just put the ladies off to the right of the house, but you can put them anywhere you like. When you’re done with the Owen’s women, put your fence up in front of them. Now, I ended up cutting my fence up a bit to give it a door and. This was a purely aesthetic choice, but you can leave the entire fence in one if you’d like. Once you’ve applied everything, light it up and be mystified by the results!

And that’s all there is to it! This is my first ever step-by-step and how-to. I’m beyond excited to be sharing this with you all! If you want to take part in making your own Practical Magic cloche, please tag us using @The_LeighWay on Instagram! I’d love to see what you all come up with for your own Halloween cloche!
